Drupal and DDEV


Introduction
DDEV is an open source tool that uses docker to quickly create local PHP development environments. It has different templates for different frameworks/CMS such as generic PHP, WordPress, Drupal, TYPO3, Backdrop, Magento, Laravel, etc.
One of the objectives of this type of tool is to ensure that local environments are homogeneous, which enhances workflows in development teams, as each member works with the same technological versions.
In this post we will see how to install and deploy in a few minutes a local DDEV environment in ubuntu using Drupal 9.
Prerequisites
A local machine with:
- Linux: Ubuntu 16.04+, Debian Jessie + or Fedora 25+
- Docker version 18.06 or higher and docker-compose 1.21.0 o higher installed.
- Git version control (only for the installation of existing projects).
Installation and configurations
Installing DDEV on Linux:
Installation via Linuxbrew:
For the installation of ddev it is recommended to install it using the Homebrew package manager on Linux. Once this manager is installed, the commands to execute are as follows:
To install the latest stable version of DDEV:
brew tap drud/ddev && brew install ddev
To install the latest version:
brew tap drud/ddev-ede && brew install ddev
If in the future you wish to upgrade the version of ddev on your computer, simply close ddev and upgrade.
ddev poweroff && brew upgrade ddev
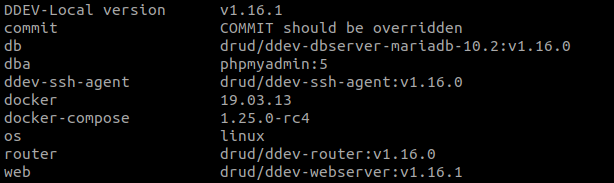
Once DDEV is installed or updated, we verify the software with the following command:
ddev version
And we will be able to check the installed or updated version.
Installation via command line:
Pre-installation packages:
sudo apt install build-essential apt-transport-https ca-certificates software-properties-common curl
Installing ddev:
curl -LO https://raw.githubusercontent.com/drud/ddev/master/scripts/install_ddev.sh && bash install_ddev.sh
Once DDEV is installed, we verify the software with the following command:
ddev version
DDEV commands
With the command ddev or ddev -h we will obtain the list of commands provided by ddev. All of them must be executed in the root of the project. There are some of them:
- ddev config: Configure a project for ddev. For example for a drupal distribution, wordpress, etc.
- ddev ssh: Allows access inside the container.
- ddev start: Starts the container.
- ddev stop: Stops the container.
- ddev import-db: Imports a database.
- ddev export-db: Exports a database.
- ddev composer: Allows to run composer inside the container. For example: ddev require drupal/module
- ddev xdebug: Enables xdebug
- ddev drush: Direct access to the drush CLI. For example: ddev drush cr
- ddev logs: To display the apache log
Container for a Drupal 9 project
Installation of a new project:
Create the root directory:
mkdir drupal-9
We access the folder:
cd drupal-9
We create the project-specific directory structure:
ddev config --project-type=drupal9 --docroot=web --create-docroot
Within the folder we will have created a directory tree as shown below.
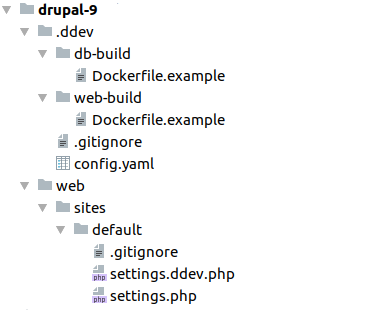
The settings.php will include the settings.ddev.php file created with the installation of ddev. This file will be the one with the necessary settings for our drupal references, for example the database connection or configuration directory.
We start the container.
ddev start
The above command will show an output like the one below:
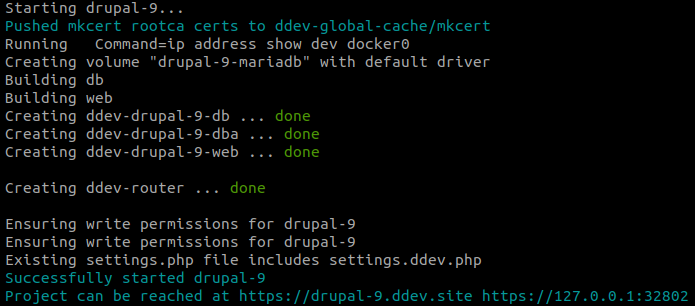
So now we have our container up and the web access urls available, which are shown in the image above. If we access these urls we get a 403 error, and this is because the drupal project is not yet installed. It is necessary to install it using the composer package manager as shown below.
We install drupal using composer, which will download the drupal core with all its dependencies.
ddev composer create "drupal/recommended-project"
Once executed, we will have a drupal project writing the urls previously mentioned in our browser. Another way to access the url is by executing the command "ddev launch" which will open a browser window with the url generated by ddev.
Installing drush for drupal:
ddev composer require "drush/drush"
At this point we can install drupal via the front-end (using the installation wizard) or via drush.
Installation of an existing drupal 9 project:
Clone the repository:
git clone git@github.com:example/example-site.git drupal9
Access the folder:
cd drupal9
We create the directory structure that ddev needs:
ddev config --project-type=drupal9
At this point you should check if the settings.ddev file is being included in the settings.php of the application and see if it is properly referenced.
We start the container:
ddev start
Import the database:
ddev import-db --src=drupal9-database-project.sql
And access to the browser:
ddev launch
Conclusions
- DDEV provides us with a pre-configured local development environment for drupal with a quick setup in just a few minutes.
- It allows to have several environments up at the same time.
- No knowledge of docker is required.
- We have tools such as Composer, Drush or XDebug available for our developments.